AI Virtual Try-On With a Clothing Reference Photo
You can upload a photo of clothes alongside a person photo to generate an AI outfit preview. The person photo supplies the wearer and scene; the clothing reference shows the garment you want the model to follow. Add written instructions when you want to identify a particular item or change a detail.
This guide explains the reference-photo workflow in our AI clothes changer. The result is a generated styling preview, not a measurement of how the real garment will fit. Check the clothing details and the person before using or sharing the image.
What the Two Photos Are For
Your person photo and outfit reference have different jobs:
| Input | What it supplies | What to check before uploading |
|---|---|---|
| Person photo | The person, pose, visible body area, and original scene | Does the crop include the area where the new clothing should appear? |
| Clothing reference | The garment's visible design, color, shape, and details | Can you clearly identify the item you want to use? |
| Optional instructions | Which item or details to follow, change, or keep | Does the text agree with the reference and your intended edit? |
For example, a photograph of a jacket can communicate its collar shape and pocket placement without a long description. If that photograph shows a complete outfit, use the text field to identify whether you mean the jacket alone or the whole look.
If you only have an outfit idea and no clothing photo, use the prompt workflow instead. Our guide to changing clothes in a photo with AI covers that starting point.
Choose a Clothing Reference You Can Inspect
The workspace accepts flat-lay garment photos and photos of someone wearing the clothes. Choose the image according to the information it actually shows.
| Reference type | Information visible in the photo | Details that may be missing or obscured |
|---|---|---|
| Flat-lay garment | Front shape, neckline, closures, print placement, and visible fabric | How it drapes on a body; areas hidden by folded sleeves or fabric |
| On-model outfit | Styling, layering, and the garment as worn in that photograph | Construction covered by arms, hair, bags, or other layers |
Neither format guarantees a more accurate result. A flat-lay image and an on-model image can each leave out details the model must infer.
Before choosing a reference:
- Identify one target garment or a clearly defined outfit. A collage with several unrelated looks leaves the intended choice unclear.
- Make the important details visible. If the collar or sleeve matters, choose a photo that shows it rather than asking the model to reconstruct a hidden area.
- Check the colors you can actually see. Strong lighting or a color filter can make the garment's appearance ambiguous.
- Avoid relying on tiny text or logos. Even when they are visible in the reference, inspect their generated versions separately.
Use images you own or have permission to edit. A reference photo guides appearance; it does not verify the identity, dimensions, or construction of a real product.
Prepare the Person Photo for the Garment
Match the visible body area to what you want to preview. A jacket needs the shoulders and torso in view. A full-length dress needs more of the body than a cropped portrait provides.
Look at the clothing area before uploading. Crossed arms, long hair, a shoulder bag, or furniture can cover the place where the new garment should appear. Those intersections need particular attention when you inspect the output.
A front-facing jacket reference paired with a side-view person photo also leaves some garment details unseen from the target angle. You can still request the edit, but the result will include inferred details. It should not be treated as proof of the garment's actual side or back design.
Try the Outfit Reference on Your Photo
1. Put Each Image in the Correct Field
Open the clothes changer. Use Upload person photo for the person you want to edit, then Upload outfit reference for the clothes.
Click + after the last thumbnail to add more clothing references, up to four in total. For separate garments, use Additional instructions to specify which item to take from each numbered reference, such as the top from reference 1 and trousers from reference 2. Each clothing reference adds 2 credits at the same model and quality settings.
Both fields accept JPG, PNG, and WEBP files up to 10 MB per image. Check the person preview and all clothing-reference previews before proceeding. Swapping their roles changes the meaning of your request.
2. Add Instructions for the Reference
After you add the clothing photo, the text field is labeled Additional instructions. You can leave it empty to use the reference workflow, or add instructions to clarify the edit.
Useful instructions explain three things:
- Which garment in the reference you mean.
- Which visible details to follow or change.
- Which parts of the person photo should remain.
If the reference includes a jacket, shirt, and trousers, “use the jacket only; keep the person's current shirt and trousers” gives a specific boundary. It asks for that boundary to be respected; it does not guarantee that every other pixel will stay unchanged.
3. Choose Settings and Check the Total Cost
Select your model, aspect ratio, and quality setting. Generation requires sign-in and enough credits. Check the displayed cost after adding all your photos: each clothing reference adds 2 credits compared with using the person photo alone at the same settings.
Do not assume the new-account allowance covers the same number of reference-based edits as prompt-only edits. Your inputs and settings determine how much of the balance each generation uses.
Start generation when the photos, instructions, and cost match your intended request.
4. Compare Against Your Inputs Before Downloading
Use the clothing photo to check the garment and the person photo to check the wearer and scene. A result can look convincing while changing details from either input.
| Compare with | Look closely at |
|---|---|
| Clothing reference | Color, collar, sleeve length, closures, pockets, pattern, and visible logos |
| Person photo | Facial features, hair, pose, body proportions, and items you asked to keep |
| Both inputs | Clothing edges around the neck, hair, hands, waistband, and layers |
| Original scene | Background, lighting, and shadows you intended to preserve |
Choose Download if the preview meets your needs. If a detail is wrong, revise the relevant instruction or choose an input that shows it more clearly before generating again. Check the next cost; another generation also uses credits.
A Real Nano Banana 2.1 Reference-Photo Test
On November 3, 2026, we ran one clothing edit in the ImageToImageAI clothes changer using Nano Banana 2.1, 1K, and the Original aspect-ratio setting. We combined a seated café portrait with a flat-lay reference of a camel coat and rust-orange knit top.
The person input is an existing AI-generated portrait, not a customer photo. The clothing reference is an existing site illustration, not a verified retail product. This test checks how the edit follows those inputs; it does not validate real-world garment fit.
The Clothing Reference
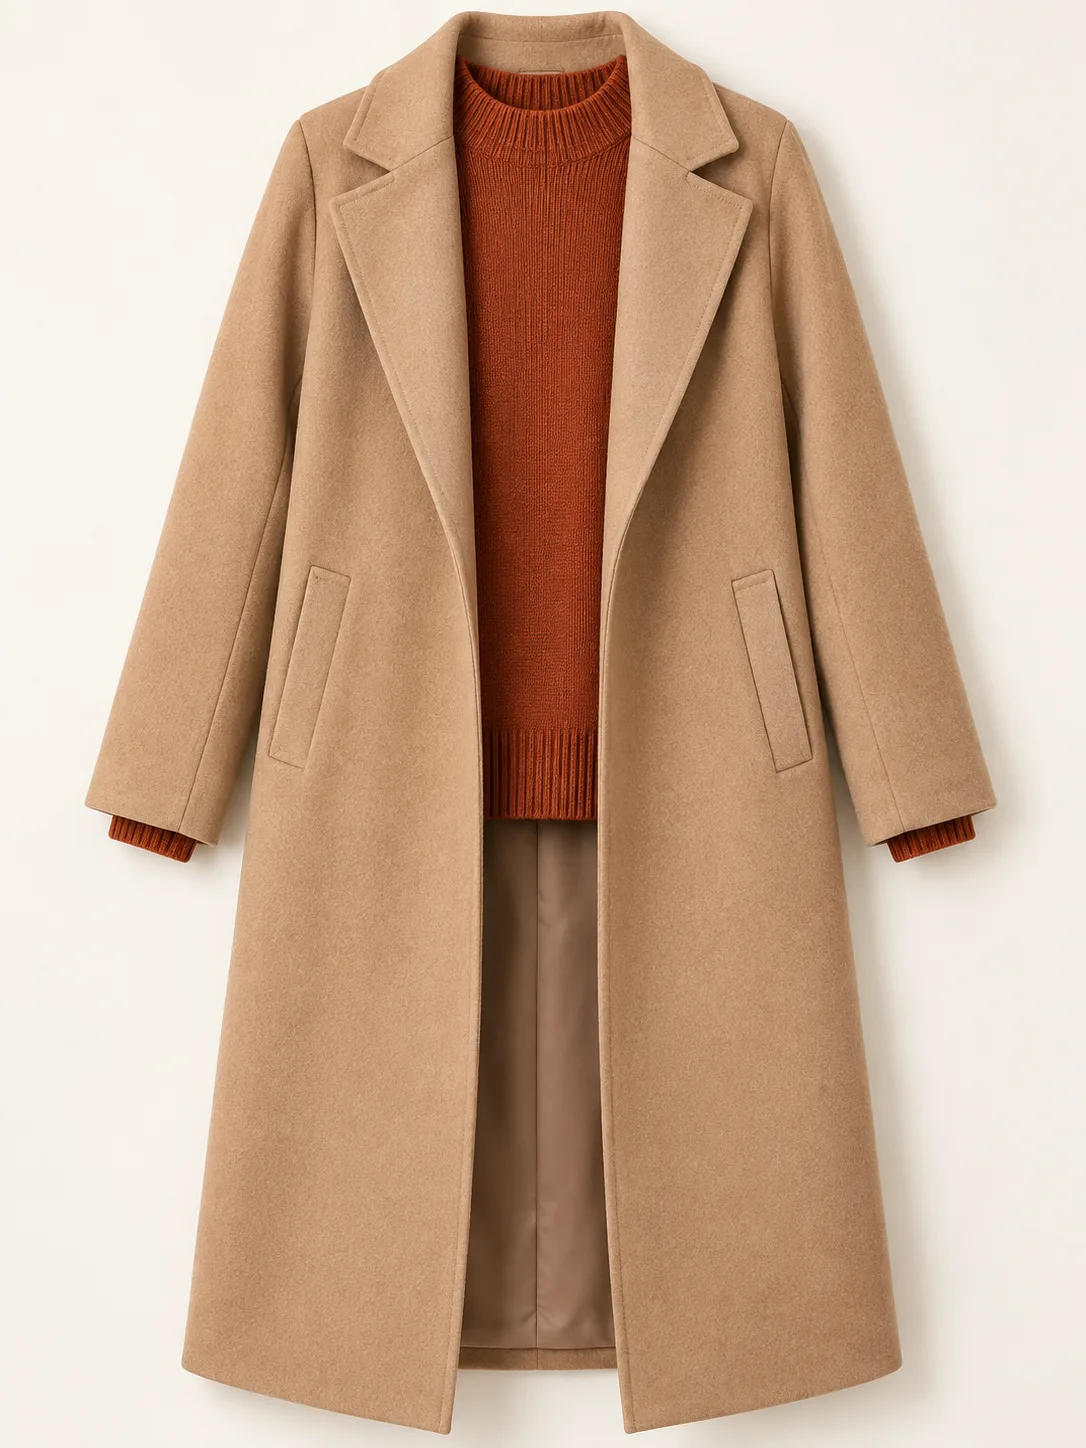
The Actual Instructions and Settings
We entered this text in Additional instructions:
Replace the visible upper-body clothing in the person photo with the camel coat and rust-orange knit top shown in the outfit reference. Follow the visible coat collar and lapel shape and the knit neckline. Keep the same person, facial features, hairstyle, seated pose, body proportions, cafe background, lighting, table, cup, and glass. Keep the original framing; do not extend the image to show the full coat. Do not add accessories.
These are the instructions we typed; the tool also adds its standard clothing-edit instructions. We ran one attempt, with no second generation to select a better-looking result.
| Test setting | Recorded value |
|---|---|
| Model and quality | Nano Banana 2.1 · 1K |
| Aspect-ratio setting | Original |
| Inputs | One person photo, one clothing reference, and written instructions |
| Credits | 12 displayed; account balance changed from 202 to 190 |
| Completion time | About 88 seconds, based on the task times shown in the interface |
| Image dimensions | Input: 1195 × 896; output: 1200 × 896 |
The time and credit cost describe this run, not a guaranteed turnaround or a price for every setting.
Person Input and Generated Result
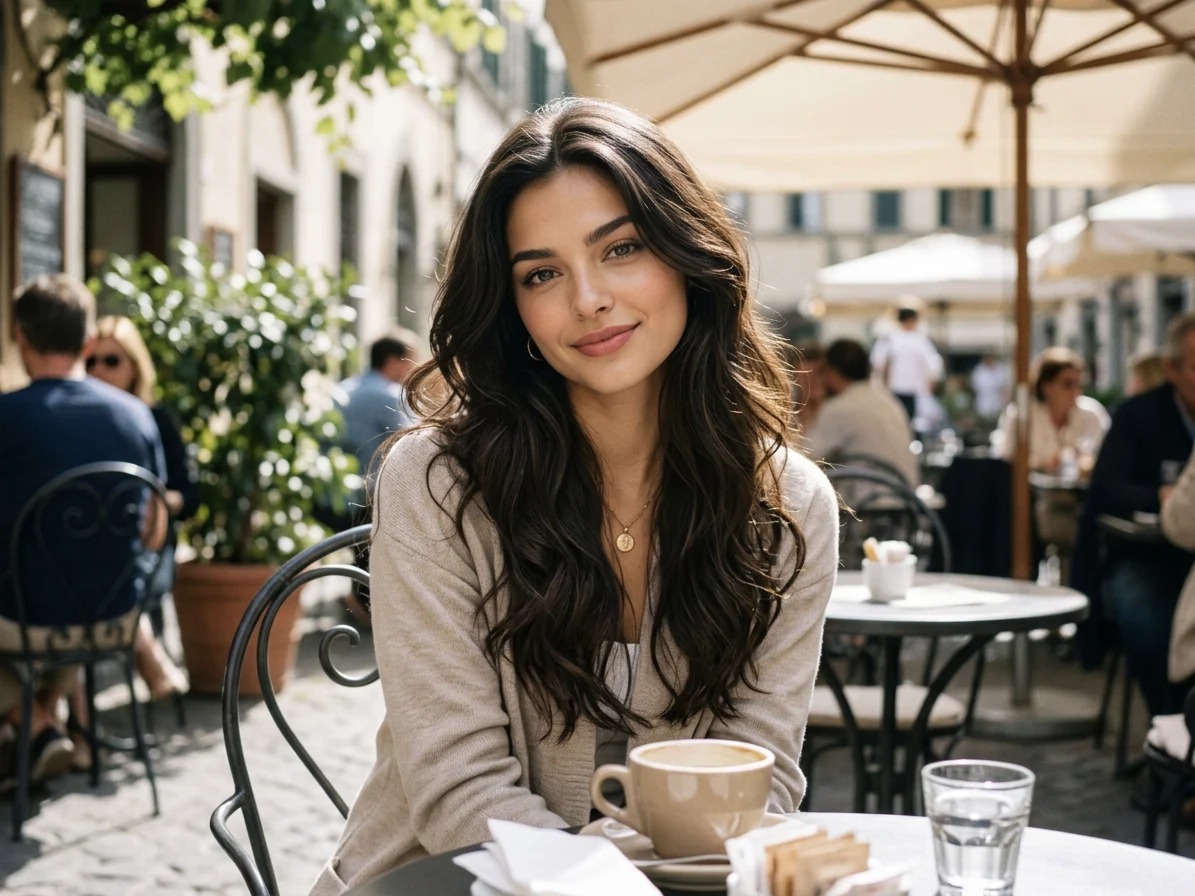 Person input
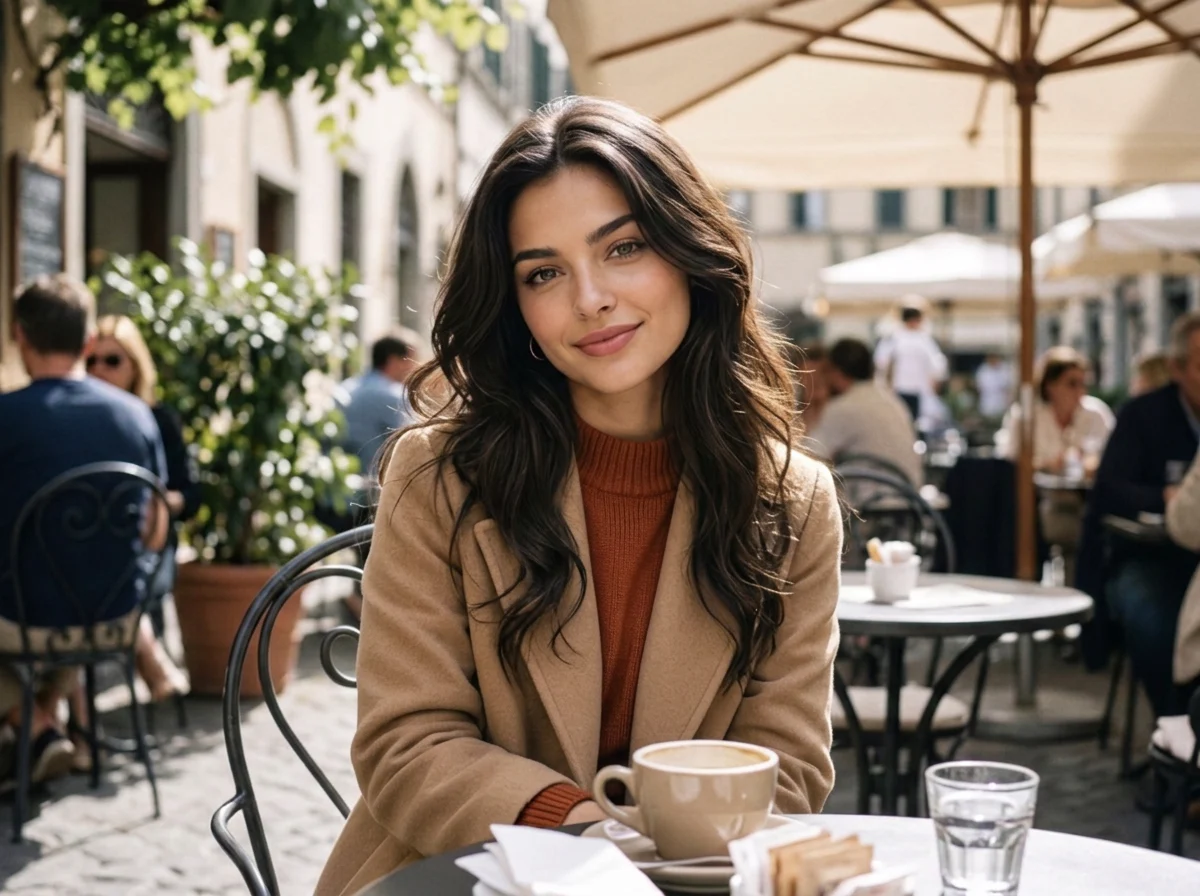 Nano Banana 2.1 result
These are the complete input and result, displayed without cropping. The result followed the requested camel outer coat, broad lapels, and rust-orange ribbed neckline. The seated pose, café composition, table, cup, and glass were broadly retained.
The original pendant is no longer visible; the higher knit neckline may cover it. That alone does not establish that the necklace was removed. Hair strands and sleeve/wrist details also differ, so this is not an unchanged copy of the original person photo. The output is five pixels wider than the input despite using Original.
The crop does not show the coat's full length or lower pockets. We cannot judge those details, exact garment construction, or real fit from this image. This single result supports an upper-body styling preview, not a success-rate claim or a comparison with other input methods.
Example Instructions for Following or Adapting a Reference
The following two prompts are untested templates, separate from the actual instructions used in the case above.
Follow One Garment and Keep the Rest of the Outfit
Suppose the person wears a shirt and trousers, and the reference shows a jacket you want to preview:
In the person photo, replace only the outer jacket with the jacket shown in the outfit reference. Follow its visible color, collar shape, buttons, and pocket placement. Keep the person's existing shirt and trousers. Keep the same person, face, hairstyle, pose, body proportions, lighting, and background. Do not copy the reference wearer's face, body, or background.
The first sentence identifies the edit. The next names the visible garment details. The remaining instructions specify the parts of the person photo you want to preserve and distinguish the reference wearer from your subject.
If your original photo has no jacket, change the first sentence to “Add the jacket shown in the outfit reference over the person's existing shirt.” Avoid describing a replacement for an item that is not present.
Keep the Design but Change the Color
For a styling variation, state how it should differ from the reference:
Dress the person in the jacket shown in the outfit reference, but change the jacket color to burgundy. Follow the reference collar, sleeve length, buttons, and pocket layout. Keep the person's current trousers and the original person, face, hairstyle, pose, lighting, and background.
This requests an adaptation rather than a copy of the reference. If your goal is to represent the actual garment for sale, a requested color variation is not evidence that the product exists in that color. For a broader explanation of change and preservation instructions, see our image-to-image prompt guide.
When the Preview Does Not Follow the Reference
First identify what differs. Then adjust the part of the input or instruction related to that difference.
| What needs attention | A possible next step |
|---|---|
| The wrong garment from the reference was used | Name the target item and say whether the other items should be ignored. Choose a reference with fewer competing garments if available. |
| A collar, button, or pattern differs | Check whether it is clearly visible in the reference. Describe the specific detail, then inspect the next output rather than assuming it will be exact. |
| Clothing appears outside the intended area | State which items from the person photo should remain; check whether the source crop supports the requested change. |
| The reference wearer's appearance affected the result | Specify that the reference supplies clothing only. A flat-lay alternative can remove the reference wearer from the input, but this is not a tested guarantee of better identity preservation. |
| The face, hands, or background changed | Keep the request focused on the garment and ask to preserve the person and scene. Reject the result if the remaining changes make it unsuitable. |
These are troubleshooting options, not measured fixes. This article does not establish which input method preserves faces or patterns best.
An outfit preview cannot tell you whether a garment will fit in real life. It does not measure your body, calculate sizing, or verify stretch, comfort, or fabric behavior. For a purchase, use the seller's actual measurements and sizing information rather than the generated appearance.
Frequently Asked Questions
1. Can I Upload a Flat-Lay Photo of Clothes?
Yes. Upload the person in Upload person photo and the flat-lay garment in Upload outfit reference. Choose a reference where the item and the details you care about are visible. The generated result can still differ from the design.
2. Can I Use a Reference Photo of Someone Else Wearing the Clothes?
Yes, if you have permission to use the photo. Treat it as a clothing reference and specify which garment to follow. Ask to keep the person from your own input, then check that the output has not borrowed facial or other unwanted details from the reference.
3. Do I Have to Write a Prompt With the Clothing Photo?
No. The clothing reference can define the outfit without additional text. Use Additional instructions when you need to select one item from a complete look, change a detail, or specify what should stay from the person photo.
4. Will It Reproduce the Exact Garment, Pattern, or Logo?
Exact reproduction is not guaranteed. Compare the generated color, construction, print, text, and logos with the reference. Do not present inaccurate details as evidence of a real product's appearance.
5. Does Virtual Try-On Predict My Clothing Size?
No. This tool generates a visual outfit preview. It does not measure your body or predict real-world sizing, comfort, or fit.